

Introduction
When it comes to Dell’s Integrated System for Microsoft Azure Stack Hub, I often hear from customers that the Patch and Update process is confusing and difficult. This leads to customers to being up to date with their Microsoft Azure Stack Hub software updates and hotfixes while falling behind on their OEM hardware-vendor-provided updates. To help with this issue, I will attempt to break down, demystify, and provide clarity to the patch and update process for the Dell Integrated System for Microsoft Azure Stack Hub 14G.
To fully understand the Dell Patch and Update process for Azure Stack Hub, we must first identify all of the pieces involved in the process and how they are used. Here are the various packages and tools involved in this process:
- Customer Toolkit zip file
- Just Enough Administration (JEA) Registration zip file
- OEM Extension Package zip file
- Dell Patch and Update Tool
- Azure Stack Hub software updates
- Azure Stack Hub hotfixes
Customer Toolkit zip file
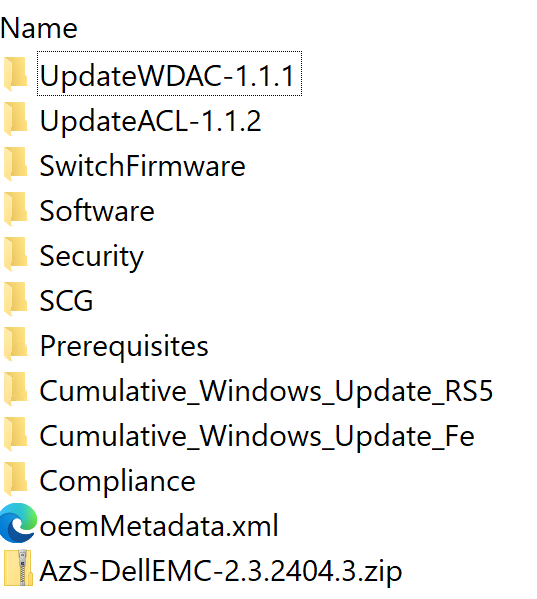
The customer toolkit zip file is a Dell engineering produced artifact that contains Dell firmware and drivers (within the OEM extension package zip file found inside the customer toolkit), Dell switch firmware files, WDAC security policy files, register JEA configuration zip file and supporting automation, and an update installer for Dell’s Secure Connect Gateway (SCG) tool that is used for hardware monitoring and proactive case creation. The customer toolkit zip file can be downloaded from the Dell Support product website for the Integrated System for Microsoft Azure Stack Hub (14G). This zip file contains everything you need to perform updates to the Scale Unit nodes (compute nodes) for the integrated system.
Just Enough Administration (JEA) Registration zip file
The Register JEA Configuration zip file contains necessary PowerShell modules and scripts that will create PowerShell session configurations on the Hardware Lifecycle Host (HLH) and the Management Virtual Machine (MGMT-VM). These Just Enough Administration (JEA) endpoints provide a secure way to make a remote connection to the HLH and the MGMT-VM while only exposing a list of allowed cmdlets and functions provided by the PowerShell session configurations.
Below is an example of the folder structure for the Register JEA Configuration zip file:

OEM Extension Package zip file
The OEM Extension Package zip file includes the necessary firmware, drivers, and PowerShell modules required for updating the scale unit nodes. These nodes are the compute servers that support the hybrid cloud infrastructure and tenant workloads, such as virtual machines and applications. Specifically, for the Dell Integrated System, the MGMT-VM acts as a “hardware manager” to stage update binaries and automate updates via the out-of-band (OOB) management interface using PowerShell scripts and the iDRAC 9 Redfish API. The OEM Extension Package zip file and the OEM Metadata XML file are uploaded to a storage account container on the Azure Stack Hub administrator portal. The update resource provider then communicates with the “hardware manager” to execute OEM firmware update automation through a JEA endpoint on the scale unit nodes.
Below is an example of the folder structure for the OEM Extension Package zip file:

OEM Extension Packages are numbered like so:
- 2.4 – Support for Fe OS (Windows Server 2022)
- 2.3 – Support for both Fe OS and RS5 (Windows Server 2022 and Windows Server 2019)
- 2.2 – Support for RS5 (Windows Server 2019)
Dell Patch and Update Tool
The Dell Patch and Update Tool is designed to deliver firmware and driver updates for the Hardware Lifecycle Host (HLH) and the management virtual machine (MGMT-VM). It also provides Windows Server Operating System security updates for the HLH and MGMT-VM, Dell switch firmware updates, and updates for the Secure Connect Gateway (SCG) application. The tool operates by using a JEA endpoint on the HLH and MGMT-VM to remotely connect to these systems and perform update tasks using the approved cmdlets and functions allowed by the JEA endpoint.
Azure Stack Hub software updates
The Azure Stack Hub software updates are provided by Microsoft. These update packages provide Windows Server security updates, non-security updates, and Azure Stack Hub software stack updates. The update package can either be a full or express update. A full update will update the host’s underlying operating system. These require planning as a longer maintenance window may be needed. An express update is scoped and does not update the underlying host operating system.
Some major updates (updates to the underlying OS version) may require that you install an OEM Extension Package first before updating to that version. For example, from Azure Stack Hub version 2306 to 2311, the underlying OS version changed from Server 2019 to Server 2022. Be sure to check the release notes for a given update for any pre-requisites that must be met first.
The below is an example from the Azure Stack Hub 2311 release notes:

Azure Stack Hub hotfixes
Azure Stack Hub hotfixes aim to address specific issues that are often time sensitive. Hotfixes can be downloaded and installed just like regular full update packages, and they usually install in hours to minutes.
Order Matters
For the Dell Integrated System for Azure Stack Hub, the recommended update path that has been tested and validated by engineering is this:
- Download and obtain the latest Customer Toolkit zip file and Dell Patch and Update Tool
- These are version specific, and the major version should be the same for both (I.E. 2407 version for the Customer Toolkit zip and the 2407 version of the Dell Patch and Update Tool)
- Apply the Register JEA Configuration which is located in the downloaded Customer Toolkit zip file to both the MGMT-VM and the HLH
- Install and run the Patch and Update tool on the MGMT-VM
- Apply any required Azure Stack Hub hotfixes (if applicable) before installing the targeted OEM Extension Package or the Azure Stack Hub update package
- In some instances, before installing a full update, there may be a required hotfix that is needed first before the update can be installed. The Microsoft Azure Stack Hub Release Notes will have this documented.
- Apply the latest Azure Stack Hub software update
- Update to the latest (or within N-1 of the latest) available OEM Extension Package via the Admin Portal on Azure Stack Hub
Let’s do this!
Step 1: Download the required files
The required files to download from the Dell Support website will be the following:
- Dell Customer Toolkit zip for the version you wish to apply
- Dell Patch and Update Tool that matches the version of the above Customer Toolkit zip file
Both of these files can be found on the Integrated System for Microsoft Azure Stack Hub 14G Dell Support product page.

Step 2: Connect to the Dell MGMT-VM via RDP
Here we will do the following:
- Create a temp directory (
C:\Temp) and enable sharing on the directory- We will use this Temp shared folder for a few things:
- Copy the DeploymentData.json and ConfigurationData.json from the HLH to the MGMT-VM.
- Copy the downloaded Dell Customer Toolkit zip file and Dell Patch and Update Tool from your external management host to the MGMT-VM.
- NOTE: You may need to right click the zip file and “Unblock” the zip file as it was downloaded from an online source.
- Extract the downloaded Dell Customer Toolkit zip to the temp directory on the MGMT-VM like so:
C:\Temp\DellToolkit
- We will use this Temp shared folder for a few things:
- Open a RDP connection from within the MGMT-VM to the HLH
- Refer to your AzS.Deployment.Worksheet or your customer project handover documentation for the IP address of your HLH.
- From within the HLH, open Windows Explorer and connect to the shared folder that was created on the MGMT-VM.
- Ex:
\\<IP Address of MGMT-VM>\Temp
- Ex:
- Locate the DeploymentData.json and ConfigurationData.json on the HLH within the D:\AzureStack directory and copy them to the shared folder on the MGMT-VM.
- On the HLH, locate in the shared folder the directory
\\<IP Address of MGMT-VM>\Temp\DellToolkit\Prerequisites - Copy the RegisterJEAConfiguration<version>.zip file from the shared folder to the HLH in a temp location such as
D:\Temp- NOTE: You may need to right click the zip file and “Unblock” the zip file as it was downloaded from an online source
- Extract the RegisterJEAConfiguration zip file to your temp directory on the HLH.
- From the HLH, open a PowerShell console window as an Administrator.
- Run the below code block to update the PSSessionConfiguration endpoint on the HLH. When prompted to provide credentials for an account, this will be the JEA account. You can re-use the previously created JEA account or set it to something new altogether.
cd D:\Temp\RegisterJEAConfiguration1.26.2407.21

.\Register-JEAConfiguration.ps1 -SystemType HLH -RemoteUser (get-credential)- Once this is complete, we are done with the HLH and the RDP session that was opened to it from the MGMT-VM can be closed.
- From the MGMT-VM, locate the RegisterJEAConfiguration<version>.zip file which should be located in
C:\Temp\DellToolkit\Prerequisitesdirectory.- NOTE: You may need to right click the zip file and “Unblock” the zip file as it was downloaded from an online source.
- Extract the RegisterJEAConfiguration zip file to your temp directory on the MGMT-VM.
- From the MGMT-VM, open a PowerShell console window as an Administrator.
- Run the below code block to update the PSSessionConfiguration endpoint on the MGMT-VM. When prompted to provide credentials for an account, this will be the JEA account. You can re-use the previously created JEA account or set it to something new altogether.
cd C:\Temp\RegisterJEAConfiguration1.26.2407.21

.\Register-JEAConfiguration.ps1 -SystemType MGMT-VM -RemoteUser (get-credential)- At this point, the MGMT-VM will reboot after applying the updated JEA configuration. Allow a moment for the MGMT-VM to reboot and then establish a new RDP connection to it.
- Install the Dell Patch and Update Tool for the Integrated System for Microsoft Azure Stack Hub.
- During the installation of the tool, use the option for “Dell EMC Mangement VM on HLH” as this tutorial is guiding you through the process of performing this from the MGMT-VM.

Step 3: Run the Dell Patch and Update Tool
The Dell Patch and Update Tool will perform the following tasks:
- Perform security and OS updates on the HLH.
- Perform security and OS updates on the MGMT-VM.
- Perform firmware updates on the HLH.
- Perform firmware updates on the Dell Top of Rack (TOR) and BMC switches.
- Switches may reboot one a time during the switch firmware upgrade step. It is recommended to plan perform this update during off-business hours or in accordance with your maintenance window procedures.
- Perform tasks related to applications running on the MGMT-VM.
- If applicable, perform tasks related to switch configurations if changes are needed to support new requirements for Azure Stack Hub.
Provide the required input to the Dell Patch and Update Tool for values such as:
- Location of the DeploymentData.json (
C:\Temp\DeploymentData.json) - Location of the ConfigurationData.json (
C:\Temp\ConfigurationData.json) - HLH JEA credentials
- iDRAC credentials
- MGMT-VM JEA credentials
- [Optional] External share credentials for backing up the MGMT-VM
- PrivilegedEndpoint credentials (cloudadmin)
- Switch credentials
- MGMT-VM OS credentials
- Azure Stack Hub Operator credentials

Once you have supplied the required input values into the tool, you are ready to run it. This will begin a pre-check process to ensure the credentials, endpoints, and environment are all valid. After the pre-check process completes, you will need to click “Update” to start the upgrade tasks and main workflow.
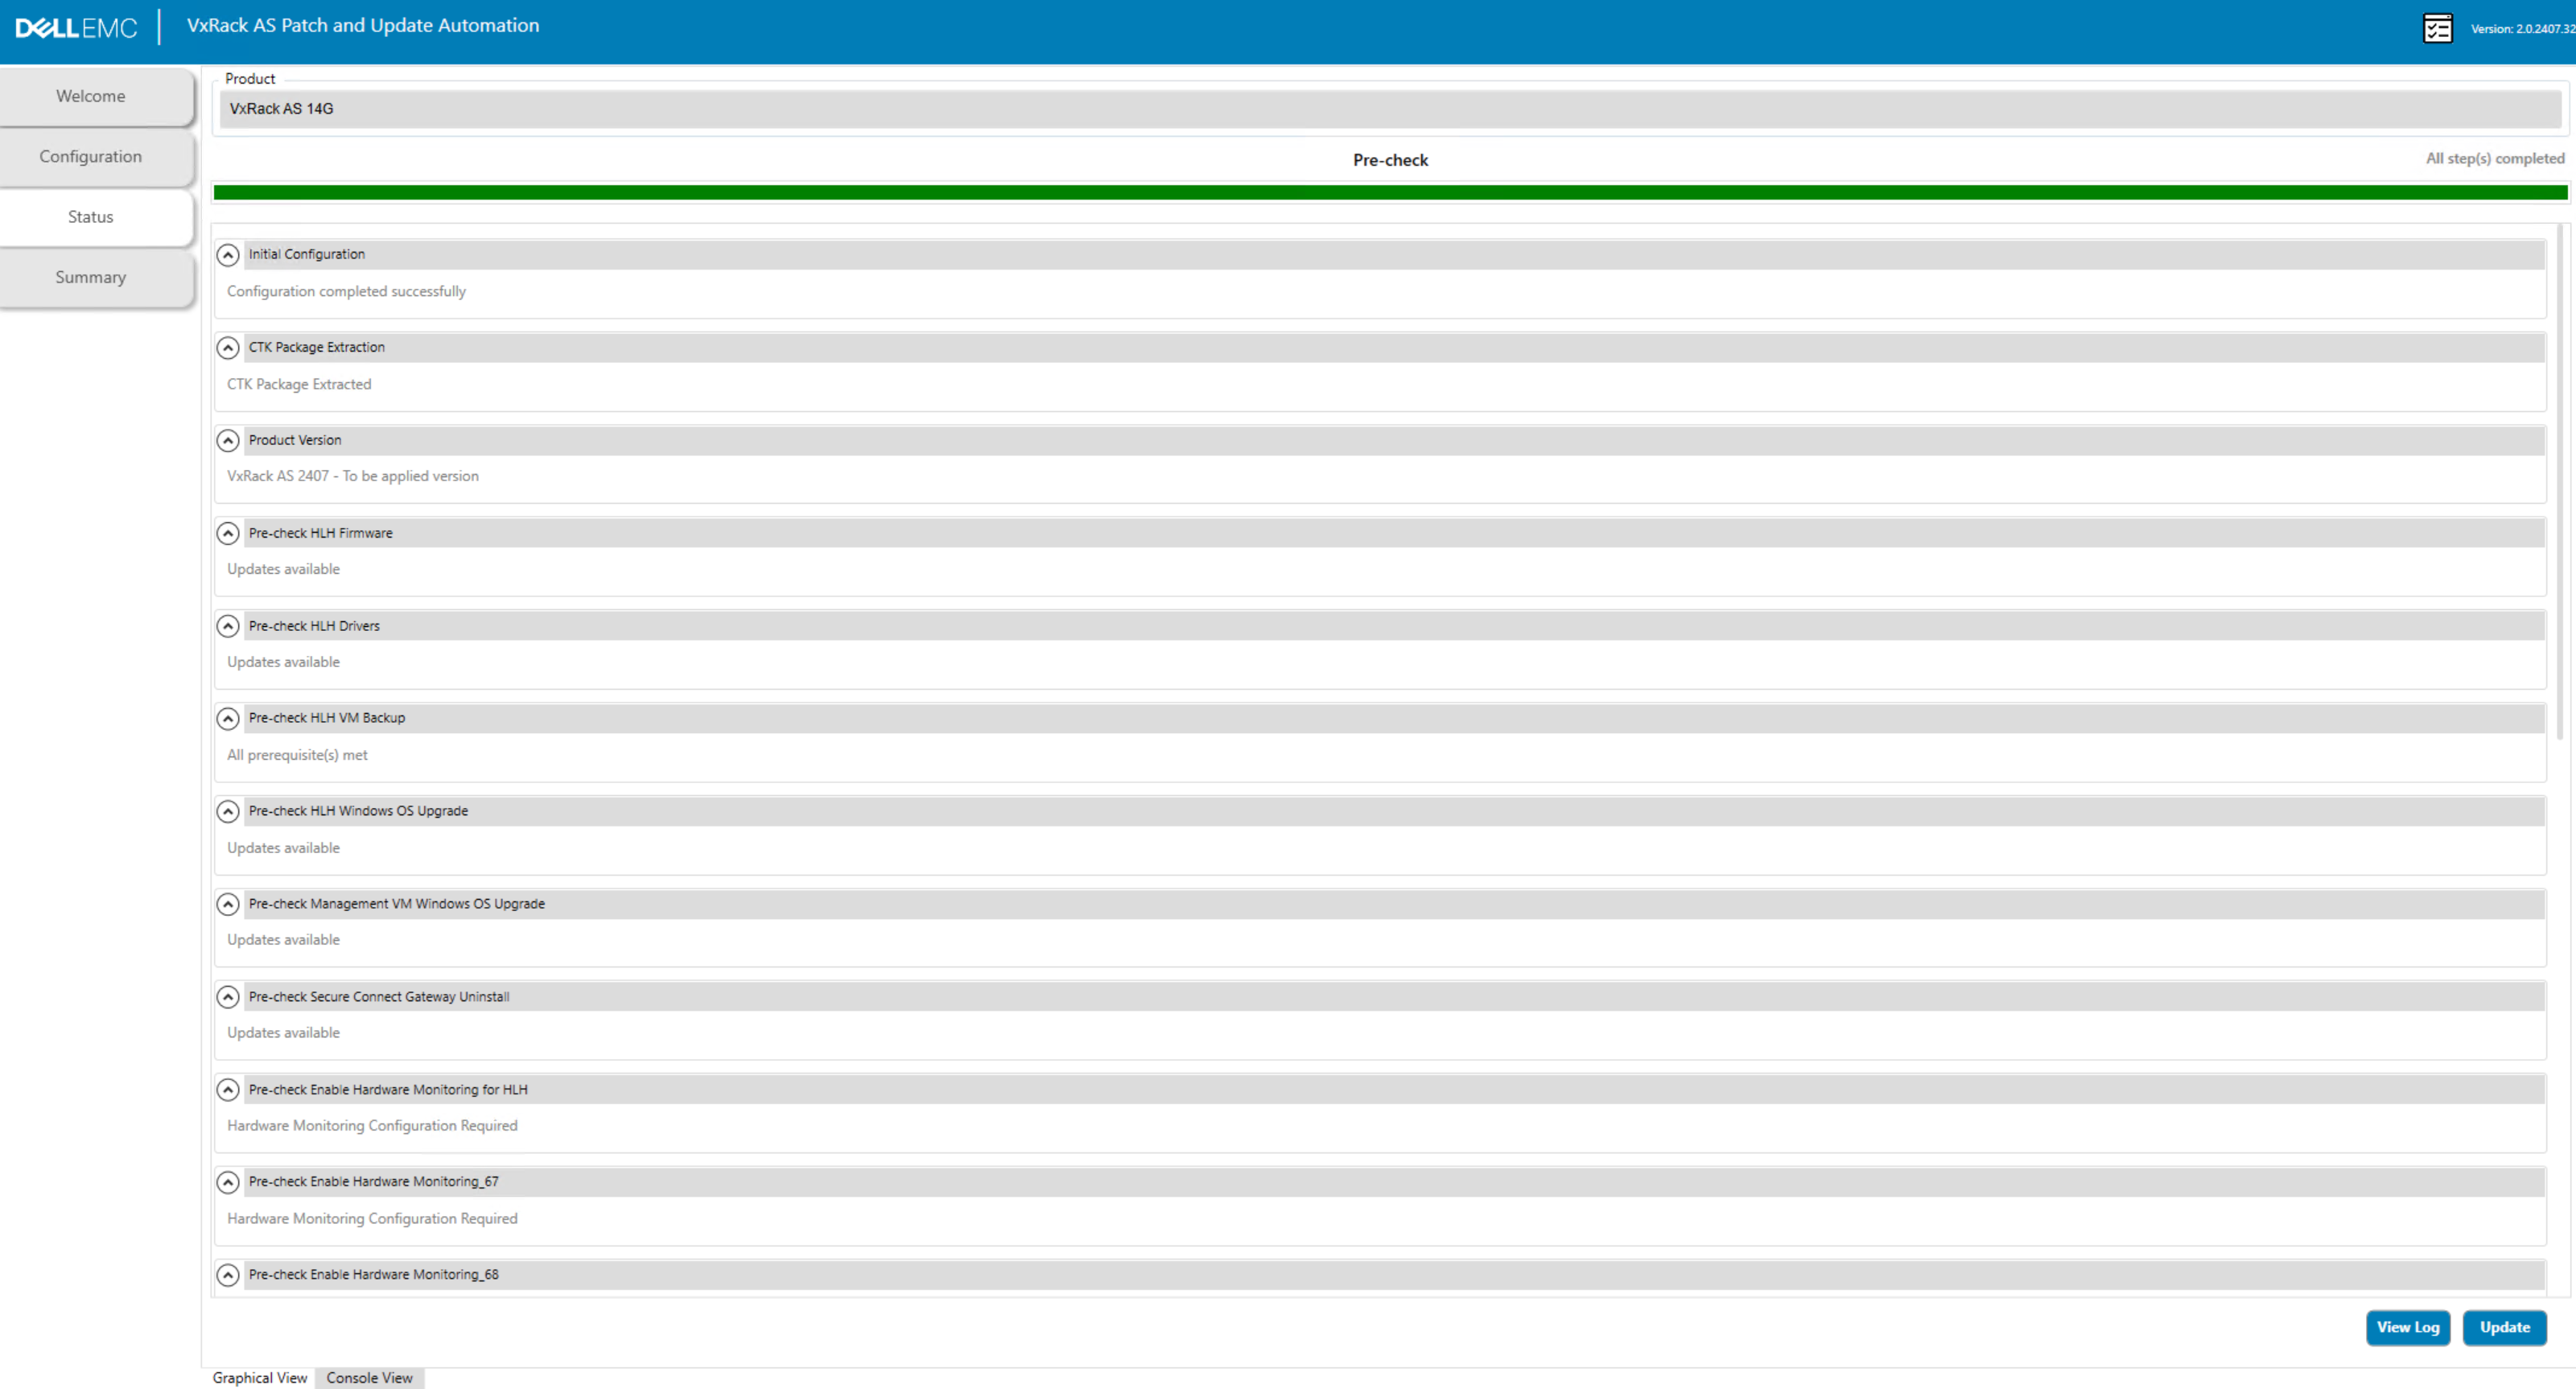
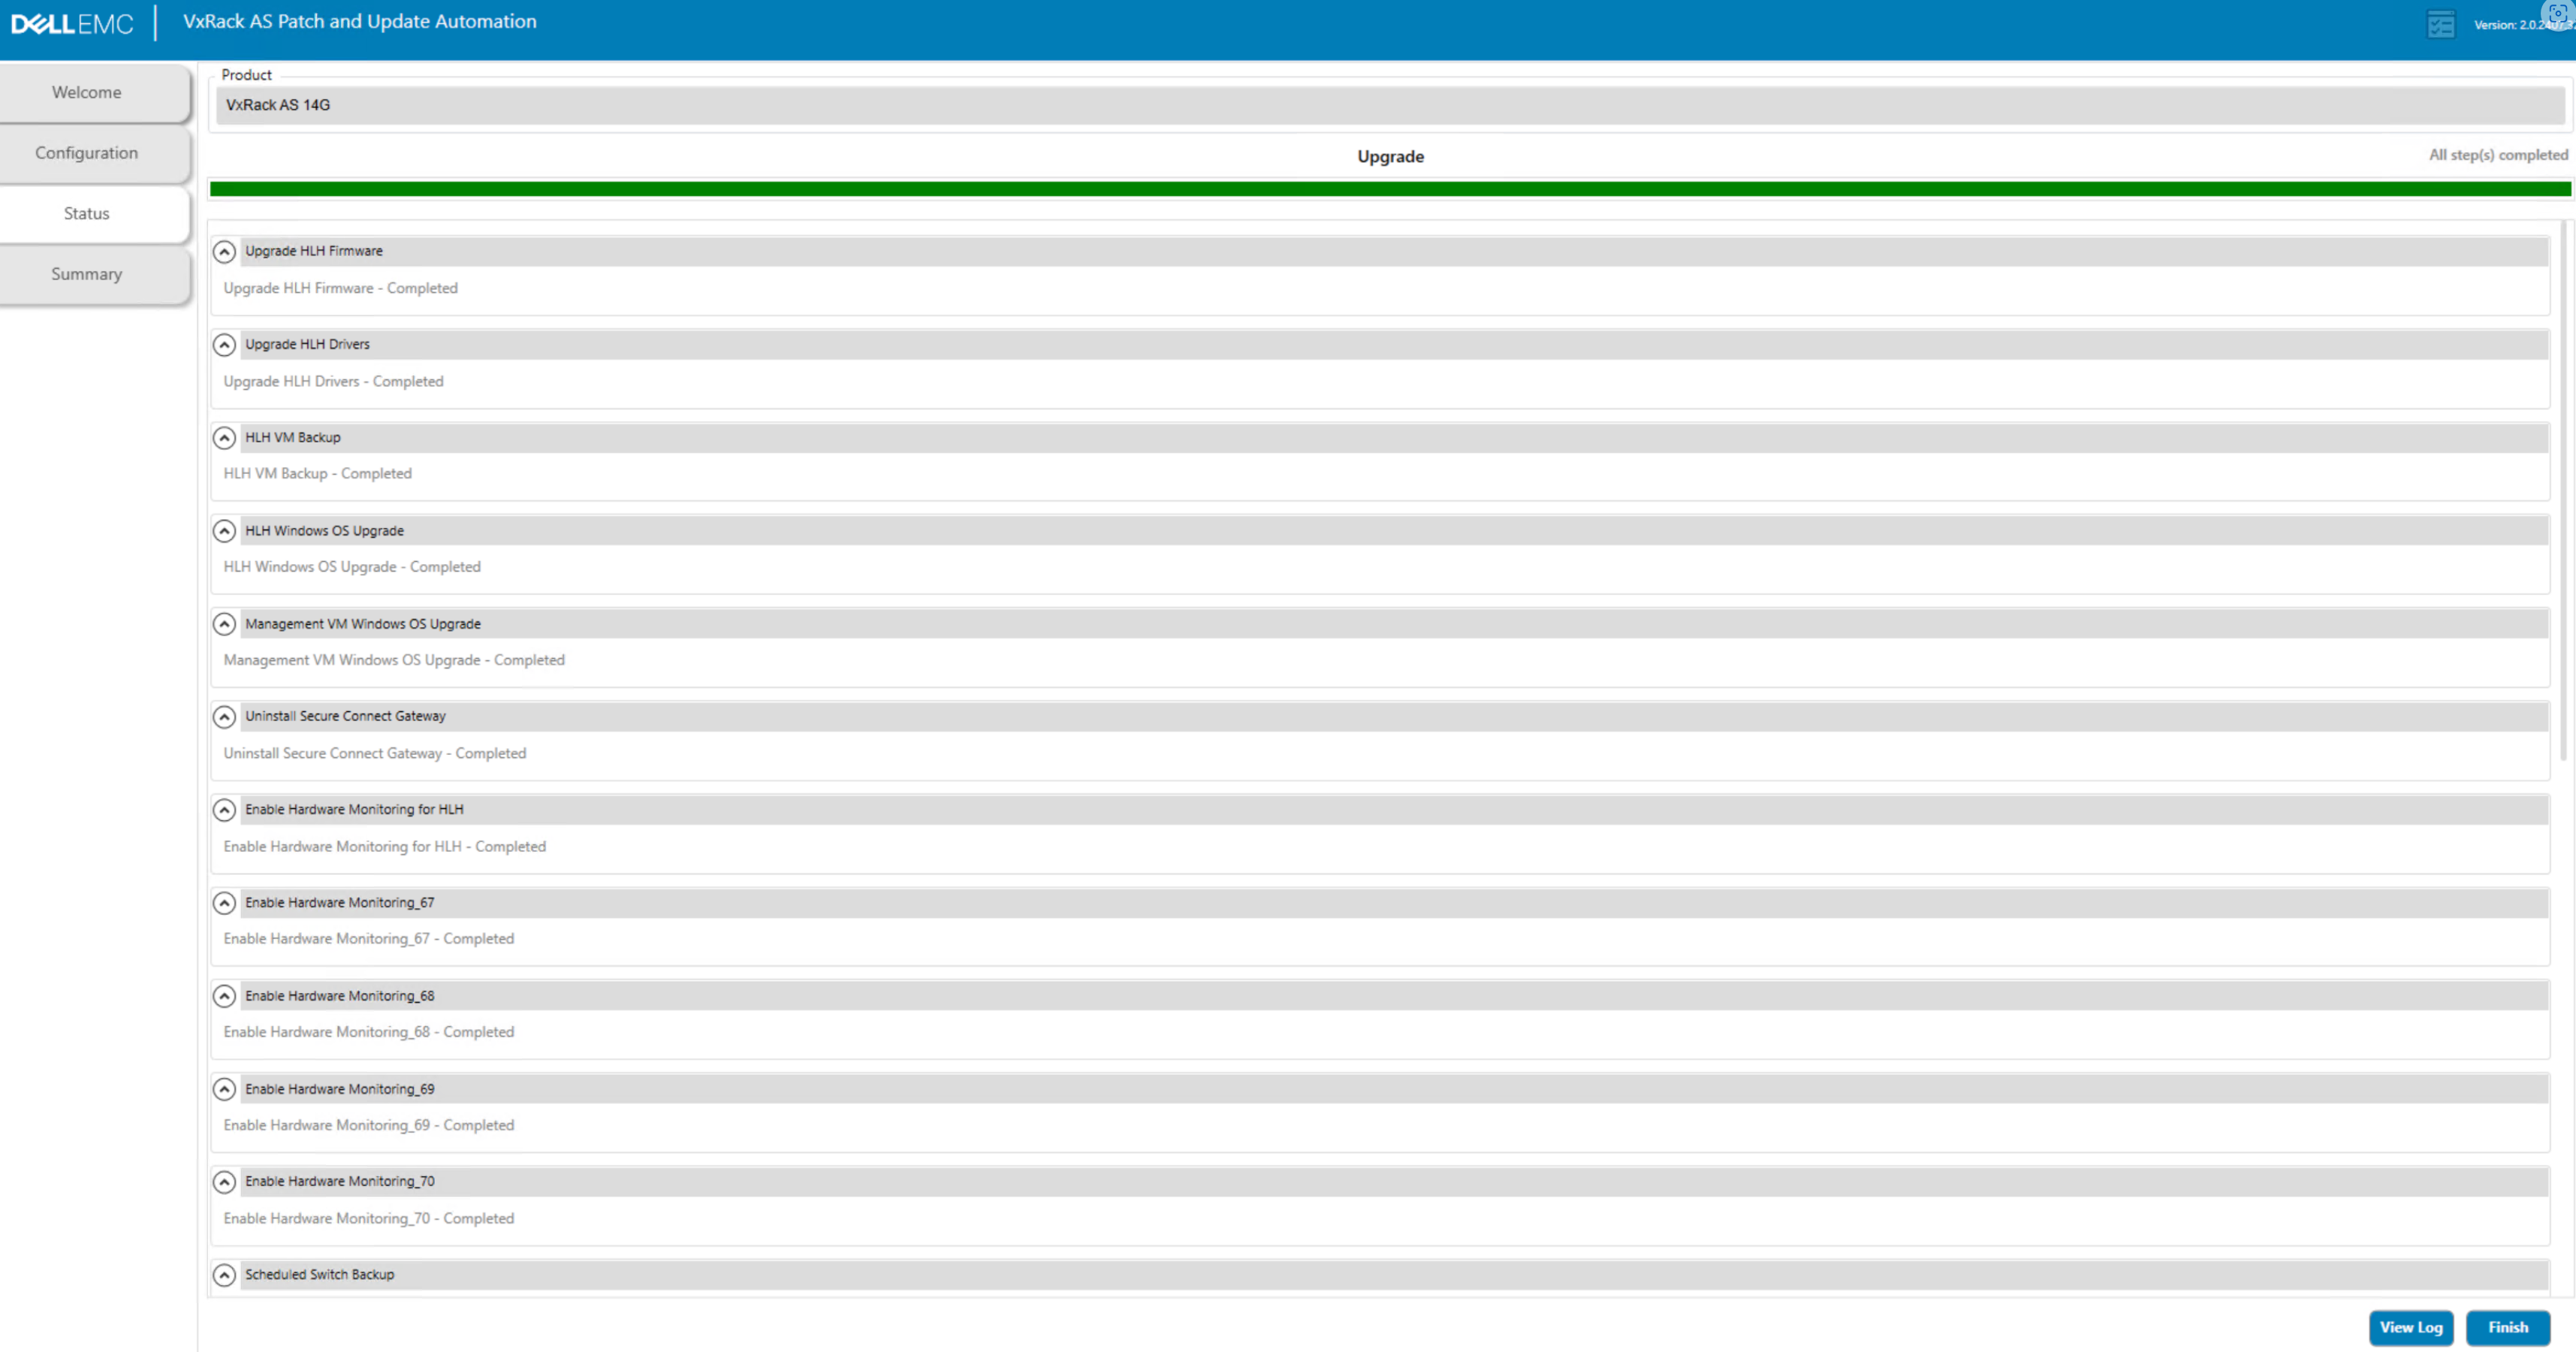
During the upgrade workflow, if the MGMT-VM reboots for any reason (such as after applying OS updates), you will need to log back into the MGMT-VM for the workflow to resume. This is by design as to avoid setting an AutoLogon for security purposes.

Once the workflow completes, you should expect to see a green progress bar indicating the run was successful. In addition, the steps should also that they have been completed.
Step 4: Apply Azure Stack Hub hotfixes
For this step, we will follow the similar process of uploading the OEM update package into the Administration Portal updateadminaccount storage account. If you have a connected to Azure deployment, then your updates should appear automatically in the Updates blade.
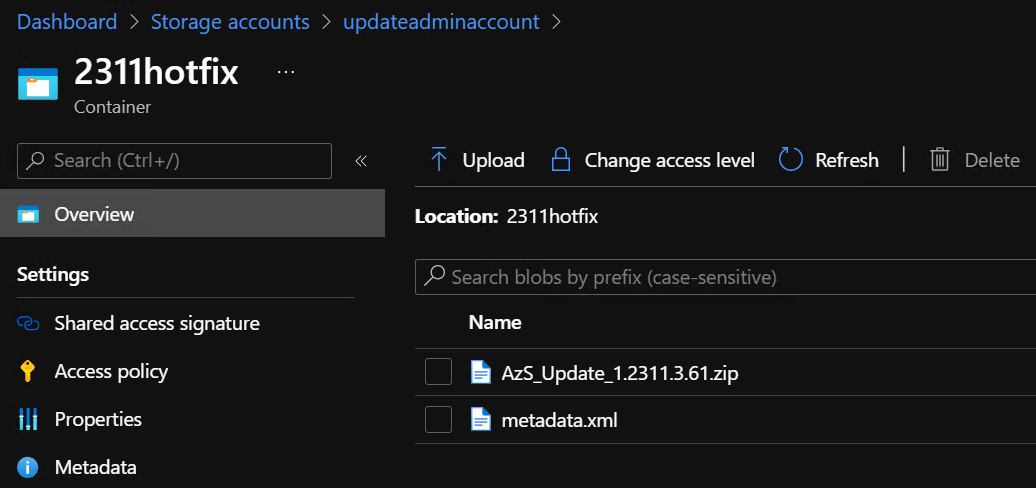
As you can see from my system, we are currently at a version of 2311. My goal is to update this to version 2406.
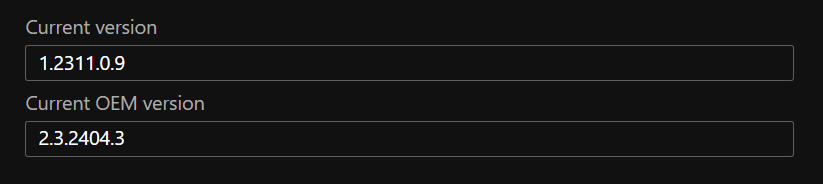
Before I can update to version 2406, I must first apply a hotfix for 2311 which is version 1.2311.3.61 at the time this post was written.

Download the hotfix zip file along with the hotfix xml file.

- Access the Administration Portal of the Azure Stack Hub system you wish to perform a hotfix update on.
- Navigate to Storage accounts > updateadminaccount > Containers
- Create a container for the hotfix update (Ex: 2311hotfix).
- Upload both the hotfix zip and the hotfix xml file to this container.
- Once uploaded to the storage account container, they should appear like so:
- Navigate back to the Dashboard and then go to the Update tile.
- The Updates menu should now show an available hotfix that can be installed.

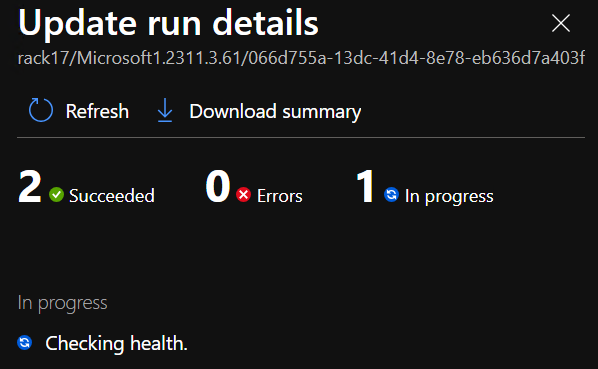
After clicking install on the hotfix, the update run details can be seen by simply clicking on the update in the Updates menu once the update has entered into a Preparing or Installing state.
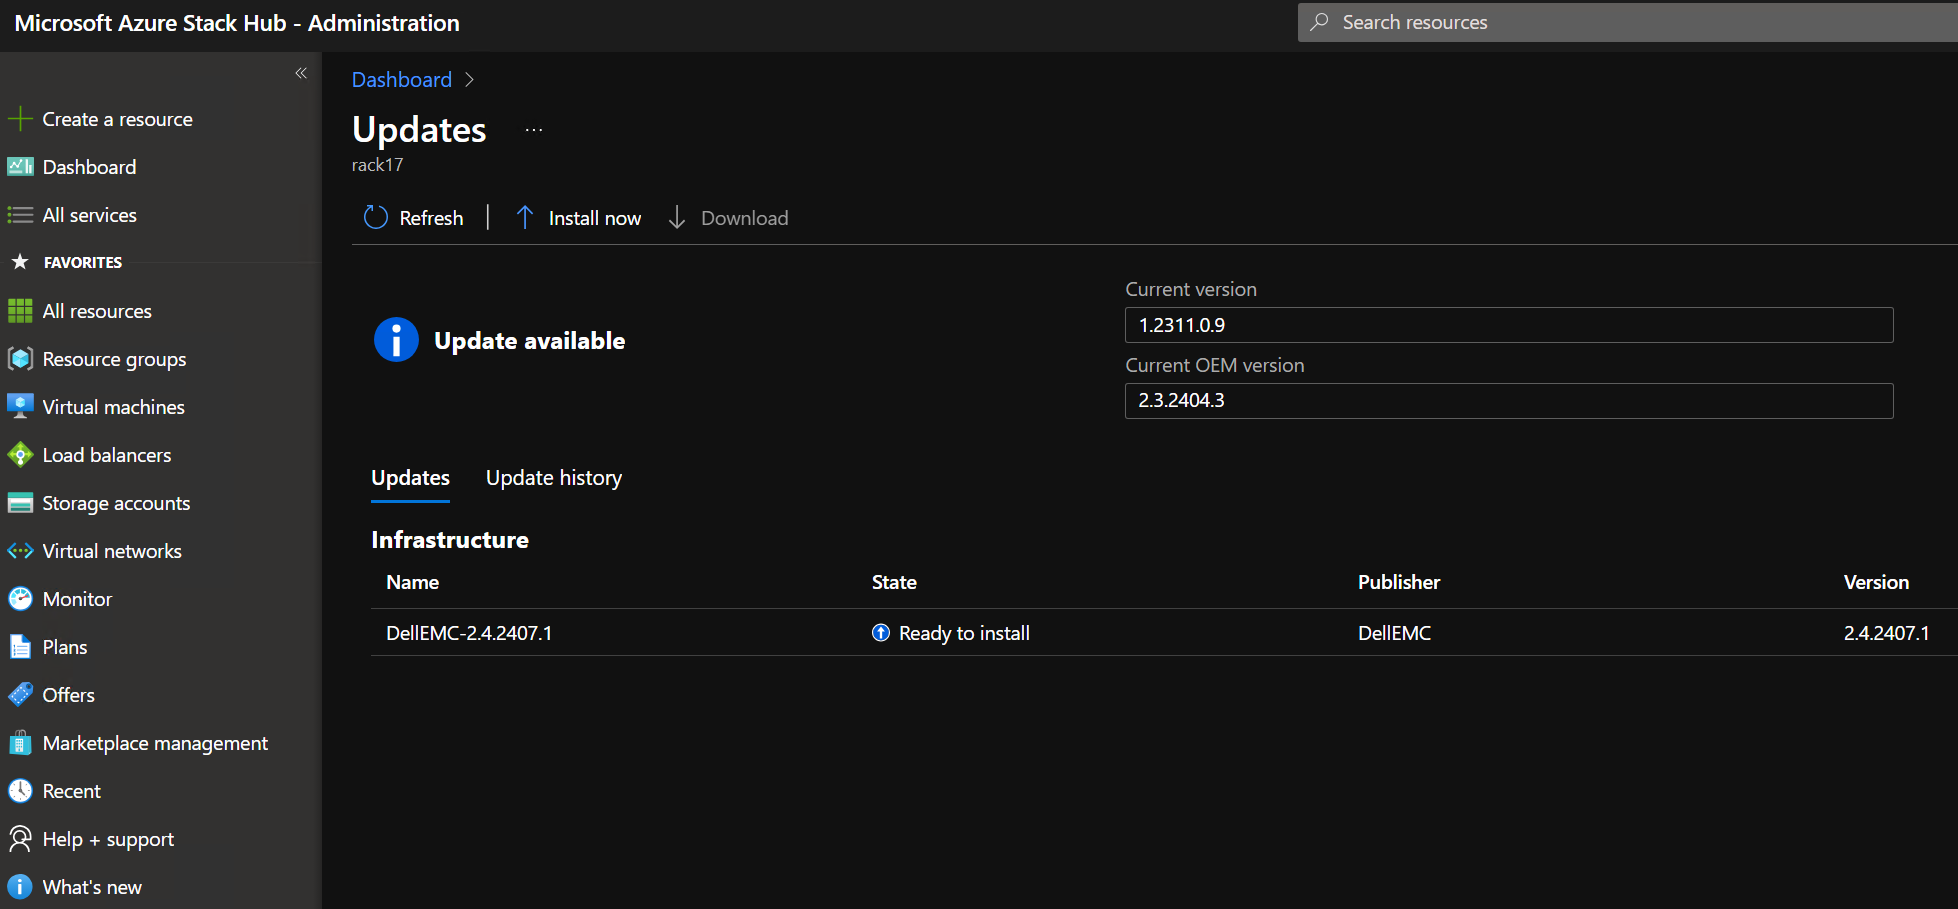
Step 5: Apply the OEM update to the Scale Unit Nodes
In order to apply OEM updates (firmware and drivers) for the scale unit nodes, we must do the following:
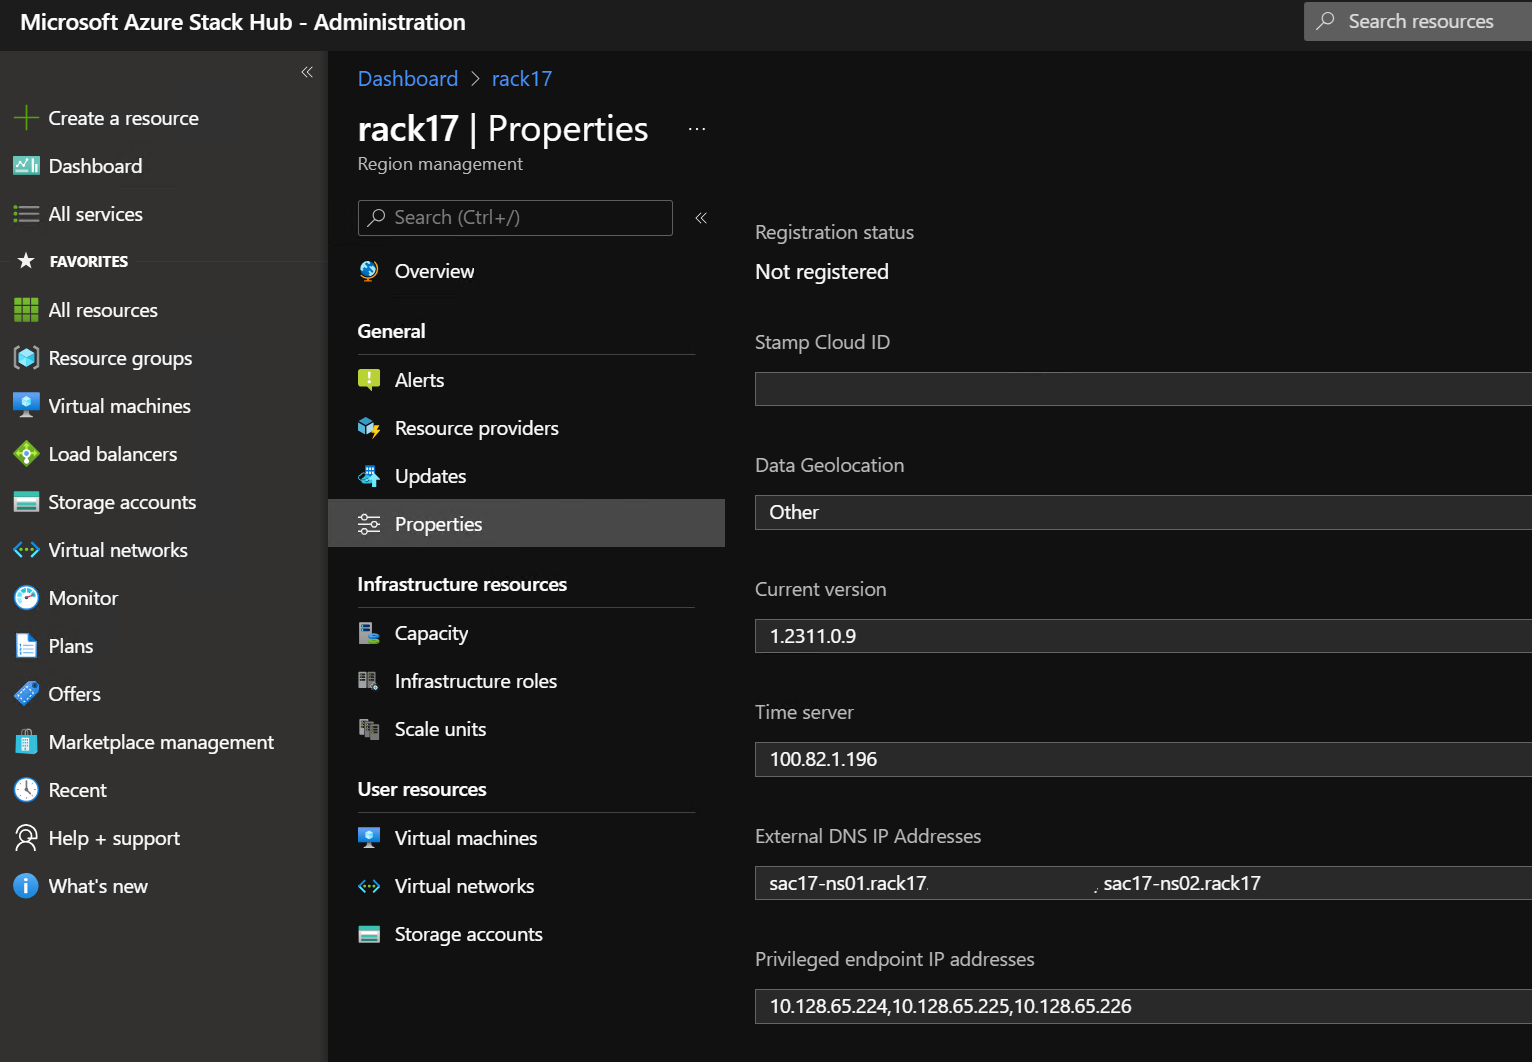
- Identify the Privileged Endpoint IP addresses for your scale unit.
- From the Administration Portal of Azure Stack Hub, navigate to Region Management > Properties
- You should see IP address values of the Privileged Endpoints.
- From a machine (such as an external Operator Access Workstation or the Dell MGMT-VM) that has routable access to the privileged endpoints, open a PowerShell console window.
- Run the below code block replacing <IP Address of ERCS> with one of the Privileged Endpoint IP addressed noted in an earlier step.
- The credential that should be entered when prompted is the CloudAdmin credential for the privileged endpoint. For most customers, the username of this account should be “azurestack\cloudadmin” as the private internal domain should be set as “azurestack.local”. Please refer to your project handover documentation for the Azure Stack Hub internal private domain name that was set for your deployment.
$cred = Get-Credential

$session = New-PSSession -ComputerName <IP Address of ERCS> `
-ConfigurationName PrivilegedEndpoint -Credential $cred `
-SessionOption (New-PSSessionOption -Culture en-US -UICulture en-US)- Once the PSSession to the Privileged Endpoint has been created, use the below code block to set the OEM External VM for the scale unit.
- When prompted to provide credentials for the
$VmCredcredential object, the credential to use here will be the JEA account that was set when the “RegisterJEAConfiguration” script was executed on the MGMT-VM in Step 2. - For Dell deployments, the
-VMTypeparameter will be set to “HardwareManager”. - For Dell deployments, the
-IPAddressto use will be the Dell MGMT-VM IP address.
- When prompted to provide credentials for the
$VmCred = Get-Credential
Invoke-Command -Session $session
    {
Set-OEMExternalVM -VMType <Either "ProxyVM" or "HardwareManager">
    -IPAddress <IP Address of hardware vendor VM> -Credential $using:VmCred
    }
You should notice an Action Plan attempt to run within the Privileged Endpoint to set the OEM External VM.

Once completed, the console output should show that the status of the Action Plan was completed.

We are now ready to upload the OEM update package into the Administration Portal of Azure Stack Hub.
Use the following steps to perform this task:
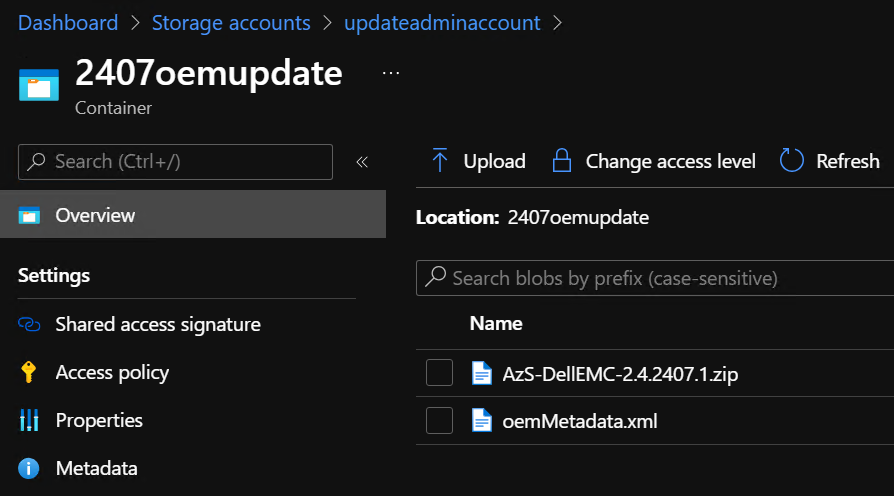
- Access the Administration Portal of the Azure Stack Hub system you wish to perform an OEM update on.
- Navigate to Storage accounts > updateadminaccount > Containers
- Create a container for the OEM update (Ex: 2407oemupdate).

- The Dell OEM update (also referred to as OEM Extension) package is located within the Dell Customer Toolkit zip file.
- You will need to upload both the zip file for the OEM Extension Package and the oemMetadata.xml that is associated with it:

- Once uploaded to the storage account container, they should appear like so:
- Navigate back to the Dashboard and then go to the Update tile.
- The Updates menu should now show an available OEM update that can be installed.
- This update will perform updates to the Scale Unit nodes one at a time and nodes may go into a “Drain” or “Maintenance” state as needed. However, it is recommended to perform this update during off-business hours or in accordance with your maintenance window procedures.
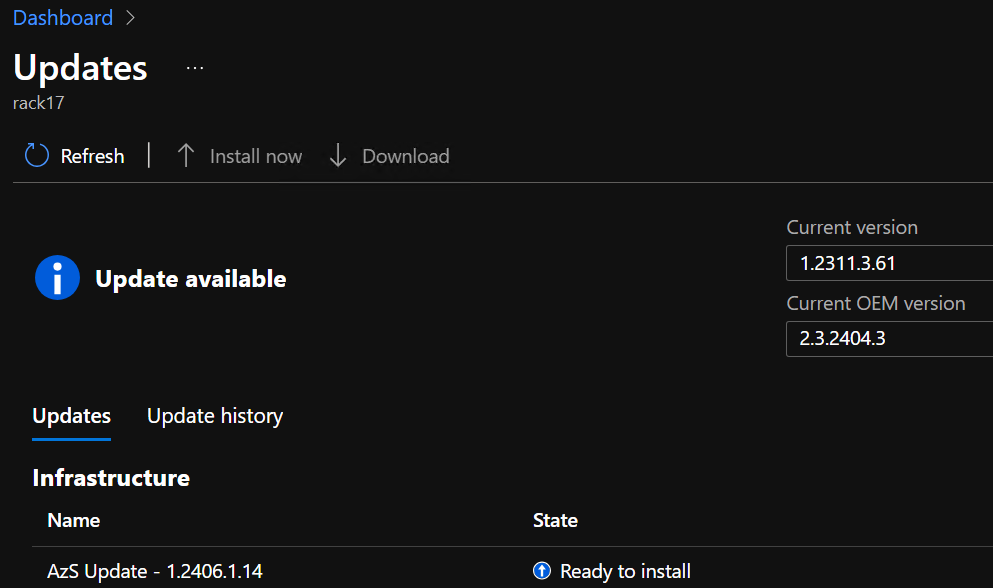
Step 6: Apply Azure Stack Hub updates
For this step, we will follow the similar process of uploading the hotfix update package into the Administration Portal updateadminaccount storage account. If you have a connected to Azure deployment, then your updates should appear automatically in the Updates blade.
It is important to check the release notes for the version you wish to apply as to the required hotfixes that may be necessary before updating to that version.
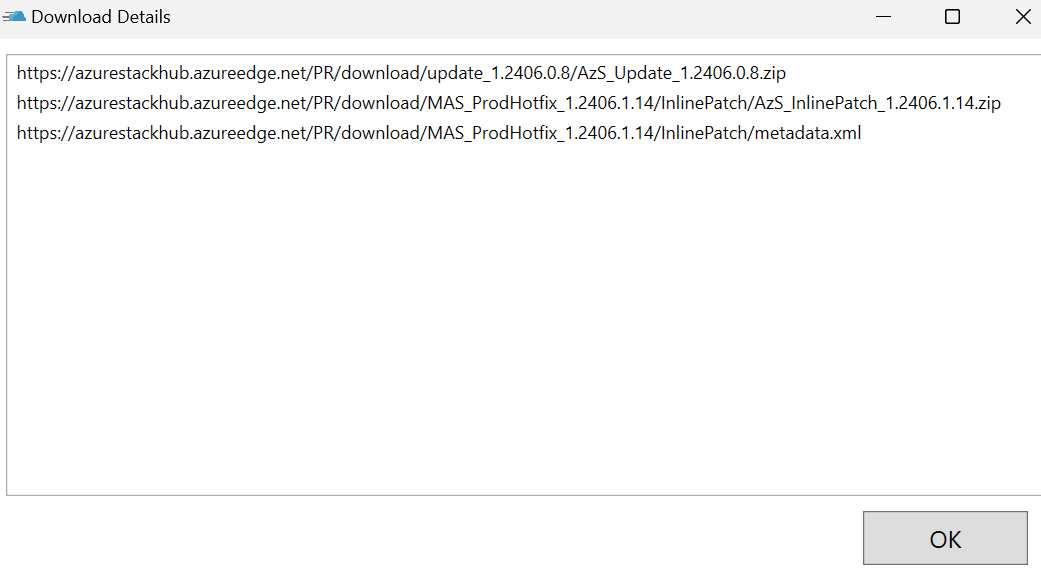
For disconnected from Azure deployments, Microsoft provides a tool called the Azure Stack Updates Downloader for downloading the required updates from a machine that is able to connect to the internet. This update package and corresponding XML file will need to then be copied to a machine that can reach the Azure Stack Hub Administration Portal and then uploaded into the updateadminaccount storage account.

Clicking the Details… button will show you the files that being downloaded.

Once the required files have been downloaded and copied over to a workstation that can reach the Azure Stack Hub Administration Portal, use the following steps to prepare and install the update:
- Access the Administration Portal of the Azure Stack Hub system you wish to perform the software update on.
- Navigate to Storage accounts > updateadminaccount > Containers
- Create a container for the update (Ex: 2406update).
- Upload the downloaded files to this container.
- Once uploaded to the storage account container, they should appear like so:

- Navigate back to the Dashboard and then go to the Update tile.
- The Updates menu should now show an available update that can be installed.
Conclusion
There you have it! If you’ve followed along up to this point, then you should have successfully updated your Dell Integrated System for Microsoft Azure Stack Hub 14G with the following updates:
- Dell updates for the Hardware Lifecycle Host, MGMT-VM, and Switches
- Microsoft hotfix update for Azure Stack Hub
- Dell OEM update for the scale unit nodes
- Microsoft full update for Azure Stack Hub
References:
- Apply Azure Stack Hub OEM updates
- Azure Stack Hub release notes (2406)
- Install Azure Stack Hub updates
- Manage updates in Azure Stack Hub
- Prepare an Azure Stack Hub update package
