VMWARE MIGRATION OF VMS AND RDMS FROM VNX TO XTREMIO – PART 3

To continue with part 3 of this series, I will quickly recap where we left off.

  • We have a source VNX and a target XtremIO that we need to migrate boot LUNs and VMware RDMs to
  • SANcopy enabler installed on source VNX
  • VNX SP ports are zoned to XtremIO target brick (in my case, I am using brick 4 of a 4-brick cluster)
  • We have identified our source LUNs and created our target XtremIO volumes

For our BOOT from SAN LUNs, we do not need these to be incremental SANcopy sessions as they are only 30GB in size each. To cutover the boot LUN, we will do the following:

  1. Place the host maintenance mode to evacuate any/all VMs on the host
  2. Shutdown the host
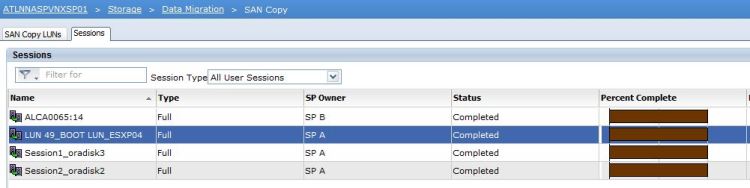
  3. Start the SANcopy session
  4. Once complete, remove the source volume from the VNX host storage group
  5. Map the boot volume to the VMware host as HLU 0 on the XtremIO
  6. Adjust host boot from SAN policy (in my case, I am working with UCS hosts)
  7. Boot host and verify successful boot
  8. Exit maintenance mode

The SANcopy session can be created in either the VNX GUI or CLI using naviseccli. You will need to know the following: source LUN name (or ID), source LUN GUID (wwn), target XtremIO FC ports, target volume mapped HLU # to the VNX initiator group.

sancopy-xtremio-3

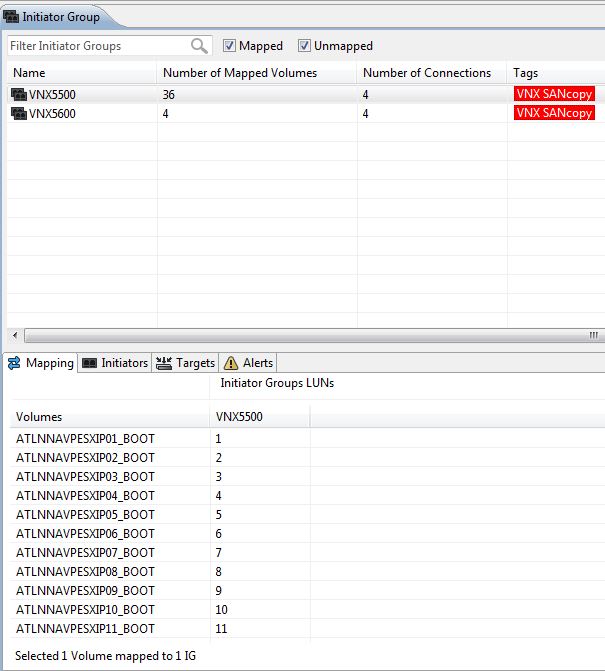
As you see here, I mapped host 1’s target boot volume as HLU 1 to the VNX initiator group. (Host 2 mapped as HLU 2, etc.) I decided to create my SANcopy sessions in the CLI as I have about 40 host boot LUN sessions to create.

naviseccli -h 10.10.10.10 -User sysadmin -Password sysadmin -Scope 0 sancopy -create -name “LUN 47_BOOT LUN_ESXP10” -srcwwn 60:06:01:60:BB:B4:30:00:61:28:DD:1D:82:F0:E1:11 -fibre -destportwwn 51:4f:0c:50:62:07:af:30 10 -throttle 8 -verify -o

This syntax breaks down like this:

naviseccli -h (SP IP) -User <username> -Password <password> -Scope 0 sancopy -create <session name> -srcwwn <source LUN GUID / WWN> -fibre -destportwwn <XtremIO target FC WWN> <destination LUN number (HLU)> -throttle <0 – 10> -verify -o

While scripting out my session create commands, I am alternating between SCs and ports on the XtremIO to balance the load out.

sancopy-xtremio-3-1

As for our incremental sessions, we need to create a Reserved LUN Pool that the incremental sessions will use. For that we will follow EMC best practices and create our incremental sessions accordingly. More to come on that soon!

VMware Migration of VMs and RDMs from VNX to XtremIO – Part 2

sancopy-xtremio

In continuing with part 2 of this series, I’m going to discuss zoning requirements for SANcopy on the XtremIO. To recap before we begin, I have a VMware environment that I am migrating from VNX to XtremIO. Most of this environment can be migrated via storage vMotion to the XtremIO. However, there are quite a few of VMs that have physical mode RDMs that need to be migrated via SANcopy. We chose SANcopy over Open Migrator because these following reasons:

  • SANcopy enabler is installed on the source VNX
  • SANcopy will require one outage to shutdown the server on time of cutover
  • SANcopy is array-based and would not impact the host CPU
  • Open Migrator is only supported for Microsoft Windows Server
  • Open Migrator requires three reboots to migrate (one to attach filter driver to source and target drives, two to actually cutover one drives are in sync, and three to uninstall the software)

First things first; we need to zone our target XtremIO to the source VNX. With following EMC Best Practices, we will create 1-to-1 zones on each Fabric for SP A and SP B ports to two controllers.

Fabric A

Zones Source VNX Target XtremIO
Zone 1 SP A-port 5 X1-SC1-FC1
Zone 2 SP A-port 5 X1-SC2-FC1
Zone 3 SP B-port 5 X1-SC1-FC1
Zone 4 SP B-port 5 X1-SC2-FC1
* SP A-port 5 and SP B-port 5 are connected to Fabric A in my environment*

Fabric B

Zones Source VNX Target XtremIO
Zone 1 SP A-port 4 X1-SC1-FC2
Zone 2 SP A-port 4 X1-SC2-FC2
Zone 3 SP B-port 4 X1-SC1-FC2
Zone 4 SP B-port 4 X1-SC2-FC2
* SP A-port 4 and SP B-port 4 are connected to Fabric B in my environment*

You should end up with zones that look something like this:

zone name XIO3136_X1_SC1_FC2_VNX5500_SPA_P4 vsan 200
member fcalias XIO3136_X1_SC1_FC2
member fcalias VNX_SPA_P4
exit
zone name XIO3136_X1_SC2_FC2_VNX5500_SPA_P4 vsan 200
member fcalias XIO3136_X1_SC2_FC2
member fcalias VNX_SPA_P4
exit
zone name XIO3136_X1_SC1_FC2_VNX5500_SPB_P4 vsan 200
member fcalias XIO3136_X1_SC1_FC2
member fcalias VNX_SPB_P4
exit
zone name XIO3136_X1_SC2_FC2_VNX5500_SPB_P4 vsan 200
member fcalias XIO3136_X1_SC2_FC2
member fcalias VNX_SPB_P4
exit

Yes… yes… I know I used the acronym XIO (XIO is not XtremIO) for my fcalias and zone names. Sorry! 🙂

You can choose to split this across multiple bricks if you have more than one brick in your XtremIO cluster. Even though, you really only need to zone one storage controller at a minimum, we are choosing to zone two controllers and will split the SANcopy sessions across the two controllers to balance out the load.

Once we have our zoning in place, we should now see the VNX visible from the XtremIO. You can view this in the CLI by issuing the show-discovered-initiators-connectivity command or in the GUI by creating a new initiator group for the VNX and selecting the drop down to show the SP A and SP B WWPNs. Create a new initiator group on the XtremIO for the VNX and map the target volumes for the SANcopy session to this initiator group. Take note of the HLU you assigned to the volume mapping and also the target FC ports on the XtremIO you zoned to the VNX.

xmcli (admin)> show-discovered-initiators-connectivity
Discovered Initiator List:
Cluster-Name Index Port-Type Port-Address Num-Of-Conn-Targets
ATLNNASPXTREMIO01 1 fc 50:06:01:61:08:60:10:60 2
ATLNNASPXTREMIO01 1 fc 50:06:01:62:08:60:10:60 2
ATLNNASPXTREMIO01 1 fc 50:06:01:64:3e:a0:5a:ed 2
ATLNNASPXTREMIO01 1 fc 50:06:01:65:3e:a0:5a:ed 2
ATLNNASPXTREMIO01 1 fc 50:06:01:69:08:60:10:60 2
ATLNNASPXTREMIO01 1 fc 50:06:01:6a:08:60:10:60 2
ATLNNASPXTREMIO01 1 fc 50:06:01:6c:3e:a0:5a:ed 2
ATLNNASPXTREMIO01 1 fc 50:06:01:6d:3e:a0:5a:ed 2

sancopy-xtremio-2.jpg

The next part of this guide will discuss what is needed on the VNX source before SANcopy sessions can be created. We are going to talk about reserved LUN pool, requirements around that, and creating the SANcopy session itself. Stay tuned!


XtremIO – Tagging via CLI

Whether you are new to XtremIO or a community expert, this guide is for you! With the introduction of 4.0 code, the EMC XtremIO team introduced a new concept to manage your inventory called tagging. For those with prior 4.0 code experience, this new tagging feature replaces the folders for management concept and provides for more robust inventory management and reporting.

I worked with a customer recently who has well over 200+ volumes that were not tagged or grouped in any way. The ask of me was, how do they tag in bulk via CLI to accomplish this? This is fairly easy, but it does require a bit of trial and error as the XtremIO CLI does not provide code syntax examples as you may be familiar with on the VNX or other EMC storage arrays.

First, we need to define what we want to tag (volumes, initiator groups, etc.) Next, we see how the CLI structure/syntax is for tagging by simply issuing the create-tag command.

xmcli (admin)> create-tag
Description: Creates a new Tag object.
Usage: create-tag property=value list

PROPERTY |MANDATORY |DESCRIPTION |VALUE
======== |========= |=========== |==================
entity |Yes |Entity |string
tag-name |Yes |Tag Name |full path tag name

Next, we need to see how do we declare a volume tag or an initiator group tag as the above shows us that the tag “entity” is a string value. To show you this, I did not complete the command and I used an incorrect string value of “volumes”.

xmcli (admin)> create-tag entity=”volumes”
Description: Creates a new Tag object.
Usage: create-tag property=value list

PROPERTY |MANDATORY |DESCRIPTION |VALUE
======== |========= |=========== |==================
entity |Yes |Entity |string
tag-name |Yes |Tag Name |full path tag name

** Error: Command Syntax Error: entity property must have one of the following values: [InfinibandSwitch, DAE, Initiator, BatteryBackupUnit, Scheduler, StorageController, DataProtectionGroup, X-Brick, Volume, Cluster, InitiatorGroup, SSD, SnapshotSet, ConsistencyGroup, Target]

Now, we are cooking with gas and have something work with here. I want to create a nested volume tag that is something like this: VMware ESXi Hosts > Production Cluster

The nested volume tag will help me to filter based on my VMware hosts to see all hosts and also I can group them by their VMware cluster name as well. The environment I am managing is a mixture of VMware ESXi, RHEL, and AIX so this nested tag is extremely helpful with this. Now, let’s create our tag.

xmcli (admin)> create-tag entity=”Volume” tag-name=”IBM AIX Hosts/Oracle”
Created Tag /Volume/IBM AIX Hosts/Oracle

xmcli (admin)> create-tag entity=”Volume” tag-name=”VMware ESXi Hosts/Boot LUNs”
Created Tag /Volume/VMware ESXi Hosts/Boot LUNs

Now, I am ready to tag my volumes in bulk. I took a show-volumes dump from the XtremIO CLI, saved it to a text file, and imported it into Excel as text data fixed width. Using the volumes column and some Excel CONCATENATE magic, I have my script ready to tag all my volumes in bulk.

tag-object entity=”Volume” entity-details=”ATLNNAVPESXIP01_BOOT” tag-id=”/Volume/VMware ESXi Hosts/Boot LUNs”

As you will find out, the CLI isn’t exactly helpful with how the syntax should be. Think of tags like folders within a unix directory (the XMS is centOS after all).

xtremio-tagging-1.jpg

I hope this has proved to be somewhat useful to you as I noticed that XtremIO CLI syntax questions is often a hot topic within the EMC Communities forum.

VMware Migration of VMs and RDMs From VNX to XtremIO – Part 1

In today’s digital age with virtualization leading the way, you will often find yourself in a situation dealing with VMs and RDMs. RDMs are Raw Device Mappings and it is a way to present a physical LUN to a VM directly as if it was accessing direct-attached storage. Often what proves to be a daunting task is the ability to migration these RDMs that are attached to VMs. I’m going to discuss how to identify which VMs have RDMs, which storage array they belong to, and map it back to the physical LUN on that storage array.

  • The first thing you will want to do is to scan vCenter for VMs with RDMs
    • You will need read access to vCenter and you should have VMware powerCLI installed on your desktop
    • Connect to vCenter through powerCLI
      • Connect-VIServer yourvcenterhostname.domain.local
    • Run a get-VM script selecting the VM hostname, raw device, NAA ID, and hard disk number
      • Get-VM | Get-HardDisk -DiskType “RawPhysical”,”RawVirtual” | Select Parent,Name,DiskType,ScsiCanonicalName,DeviceName | format-table | Out-File –FilePath “out-file-location-on-your-terminal”
  • Once the script completes, you should have a text file that can be imported into excel as text data delimted or fixed width
  • Use the data filter and sort by NAA or SCSIcanonicalname
  • Use this and the source array collects or logs to compare and identify which pertain to your migration
    • In my example, I am migrating from a VNX to XtremIO. I will be using the SCSI Canonical Name and comparing that to the LUN UID/WWN from the SP collect

Example:

RDMs-list.jpg

Once you have identified the VMs in the list that pertain to your migration, you are now ready to begin planning next steps. In my scenario, I am migrating VMs residing on a VNX to a XtremIO. There is a mixture of Virtual and Physical RDMs which means that along with Storage vMotion, I will be using SANcopy to create incremental sessions and pushing the physical RDMs to the XtremIO.

Other tools such as Open Migrator and PPME (if PowerPath is present) can be used as an alternative host-based migration approach, but each tool as its caveats and may still require a reboot to cut over. I will discuss SANcopy from VNX to XtremIO in a future post.

Celerra NAS pool maxed out – manually deleting a filesystem

I recently ran into an issue that I will share with you since I was unable to find a solution online and resolved the issue myself. 

Issue: NAS pool maxed out and replications halted

When trying to issue a nas_fs -delete for a certain filesystem on a destination system, I received the following error: “file system has backups in use.” The reason you’re getting this error is either because the file system has a checkpoint schedule created or has replication checkpoints in use. In my case, it was the replication checkpoints preventing it from being deleted. Issue the following command to see the checkpoints associated with the filesystem:

fs_ckpt id=XX -list -all (where XX is the file system ID). Once you’ve identified the checkpoints that need to be deleted, issue the following command to delete them:

nas_fs -delete id=XX -o umount=yes -ALLOW_REP_INT_CKPT_OP (where XX is the checkpoint ID). Now, you should be able to go back and delete the file system with the “nas_fs -delete” command. If you go back to the source system and try to delete the replication, you will be returned an error that the destination side of the replication could not be found.

[nasadmin@NS480 ~]$ nas_task -i 648886
Task Id = 648886
Celerra Network Server = NS480
Task State = Failed
Movers =
Description = Delete Replication VNX5700_FS2 [ id=295_APM00110000_520_APM00130000].
Originator = nasadmin@cli.localhost
Start Time = Wed Jun 11 13:26:17 EDT 2014
End Time = Wed Jun 11 13:26:19 EDT 2014
Schedule = n/a
Response Statuses = Error 13160415862: The destination side of the replication session could not be found.

When deleting the replication session, use the “-mode source” flag and the replication session should now be deleted.